나의 AI Human 만들기
이어서, 기본(default) AI Human 모델로 AIPlayer 객체를 생성하고 AI 발화 절차에 대해 알아봅니다. AIPlayer가 처음 초기화될 때 네트워크 상태에 따라 모델 리소스 로딩을 하는 데 몇 분이 걸릴 수도 있습니다.
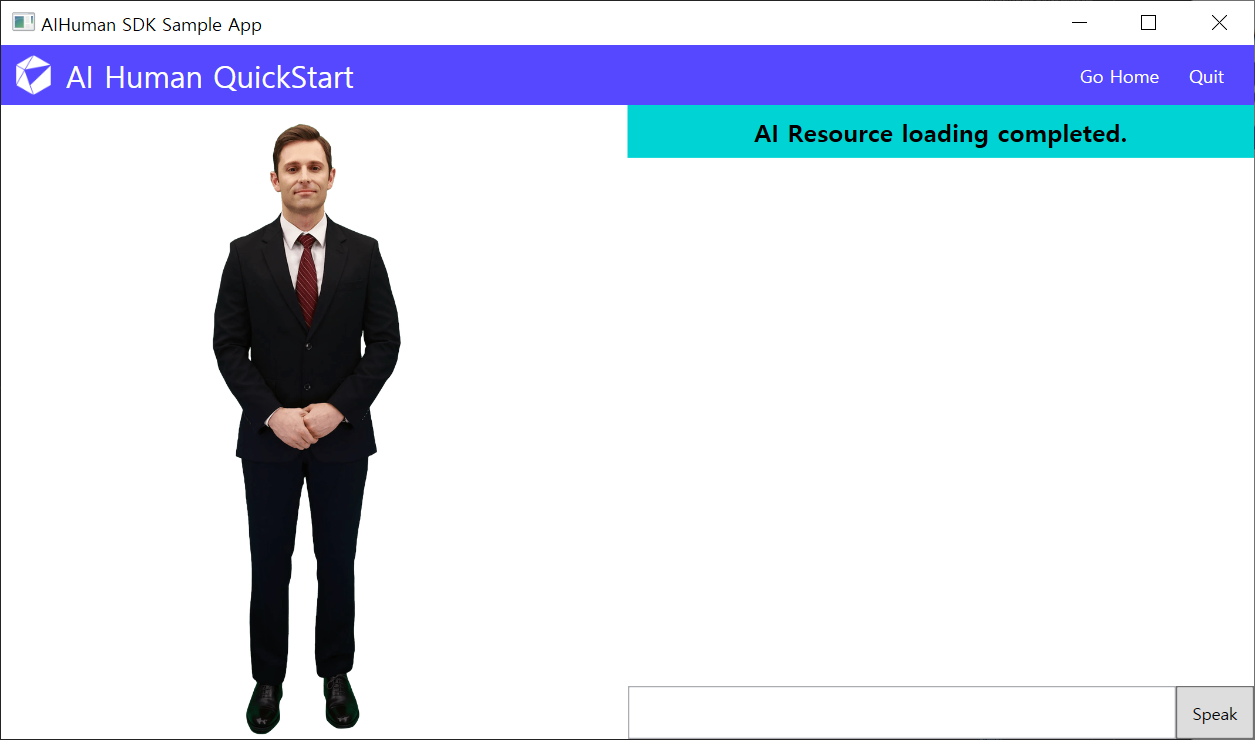
참고로 아래 내용은 AI Human 웹사이트에서 다운로드 받을 수 있는 Sample Project의 QuickStart 부분과 유사합니다.
Sample Project에서 아래 파일들을 참고하세요.
- QuickStartView.xaml
- QuickStartViewModel.cs
1. View Control 추가하기
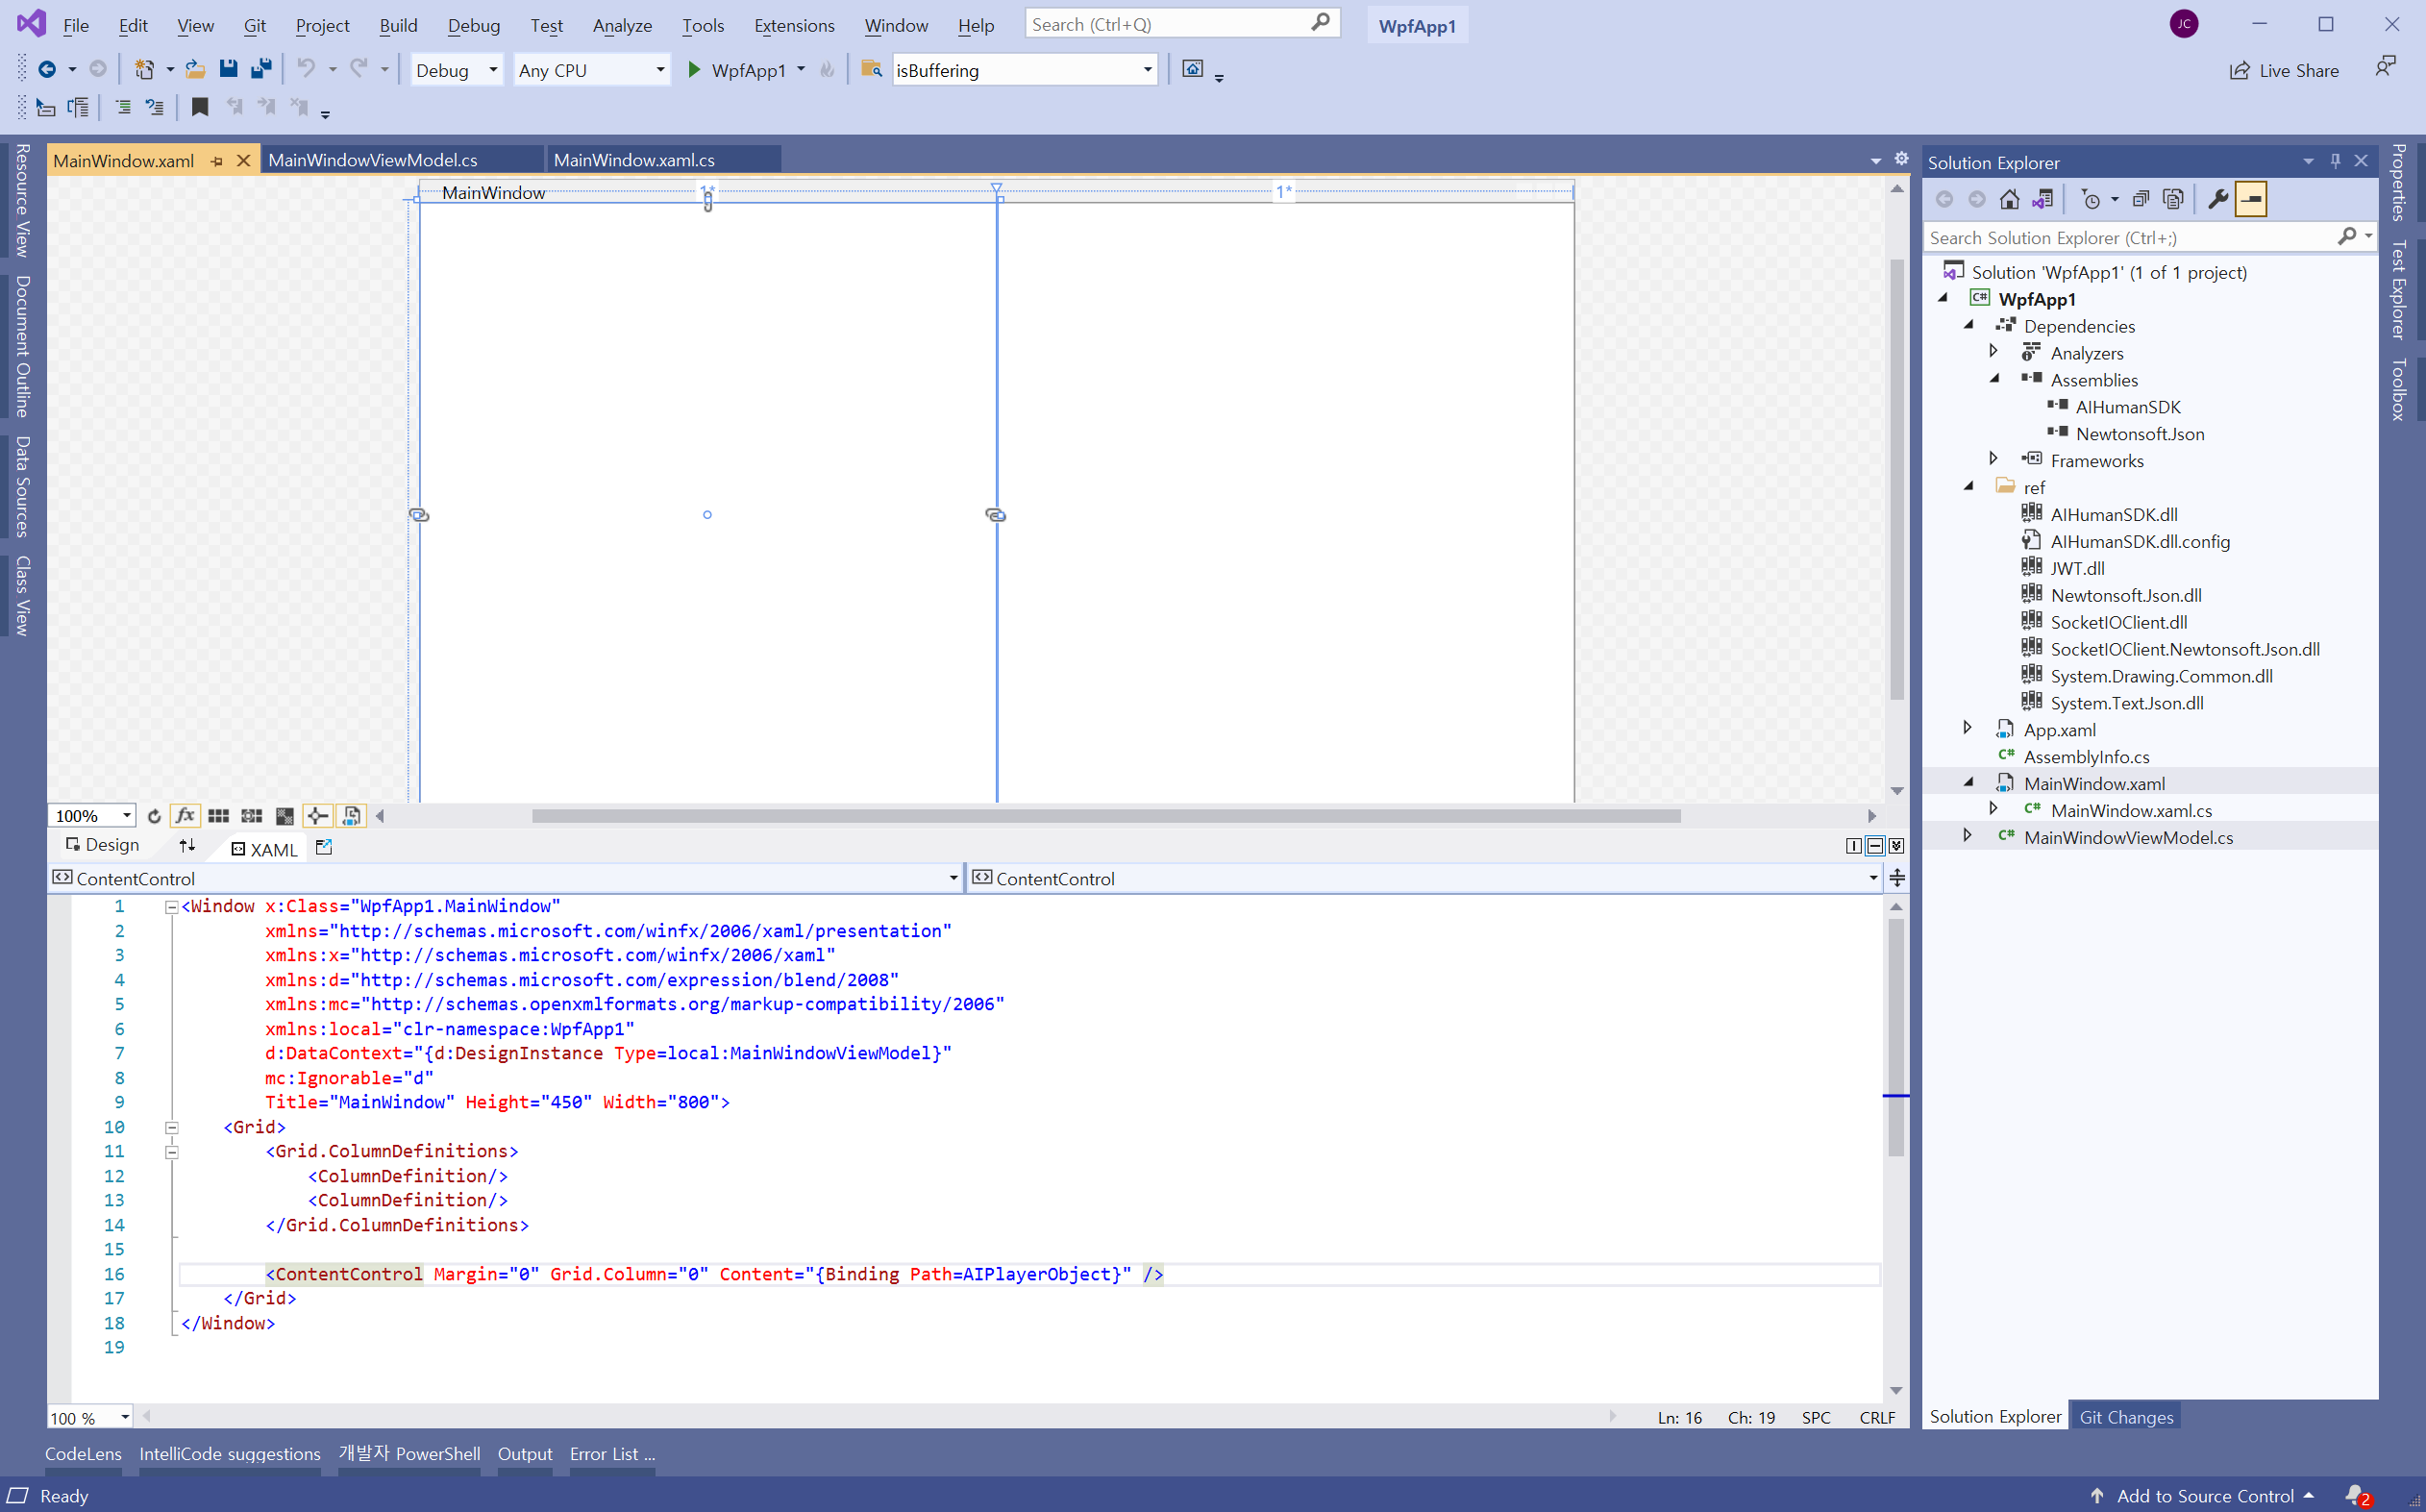
AIPlayer의 View(UserControl) 바인딩할 Control(ContentControl)을 MainWindow.xaml에 추가합니다.
AI Human을 동작하게 하는 View를 AIPlayerView라고 합니다.
AI Human 모델을 표시할 위치, 즉 Application에서 AIPlayerView를 배치할 위치를 지정합니다.
2. Authenticate 함수를 이용하여 인증하기
아래 코드를 참고하여 Application 초기화 시 SDK 인증 관련 코드를 작성하세요.
App.xaml.cs
SDK 구동을 위해 가장 먼저 인증 과정이 필요합니다.
USERKEY는 AI Human 웹사이트에서APPID를 등록하면 발급받을 수 있습니다.
using AIHuman.Core;
using AIHuman.Utils;
using System.Windows;

namespace WpfApp1
{
    /// <summary>
    /// Interaction logic for App.xaml
    /// </summary>
    public partial class App : Application
    {
        /// TODO: You must assign APPID and USERKEY.
        /// DOCS: https://docs.deepbrain.io/aihuman/windows-sdk/getting-started/projectsetup
        /// <see cref="APPID"/> is a unique ID of the project(application ID).
        /// <see cref="USERKEY"/> can be obtained by creating a project on the AIHuman Website and registering the App ID.
        private string APPID = "";
        private string USERKEY ="";

        public App()
        {
            AIAPI.Instance.Authenticate(APPID, USERKEY, (aiLIst, error) => {
                if (error == null && aiLIst != null)
                {
                    Log.Write($"Authenticate Completed, Available Count: {aiLIst.ai.Length}", Log.Level.Info);
                }
                else
                {
                    Log.Write($"Authenticate Failed: {error}", Log.Level.Error);
                }
            });
        }
    }
}
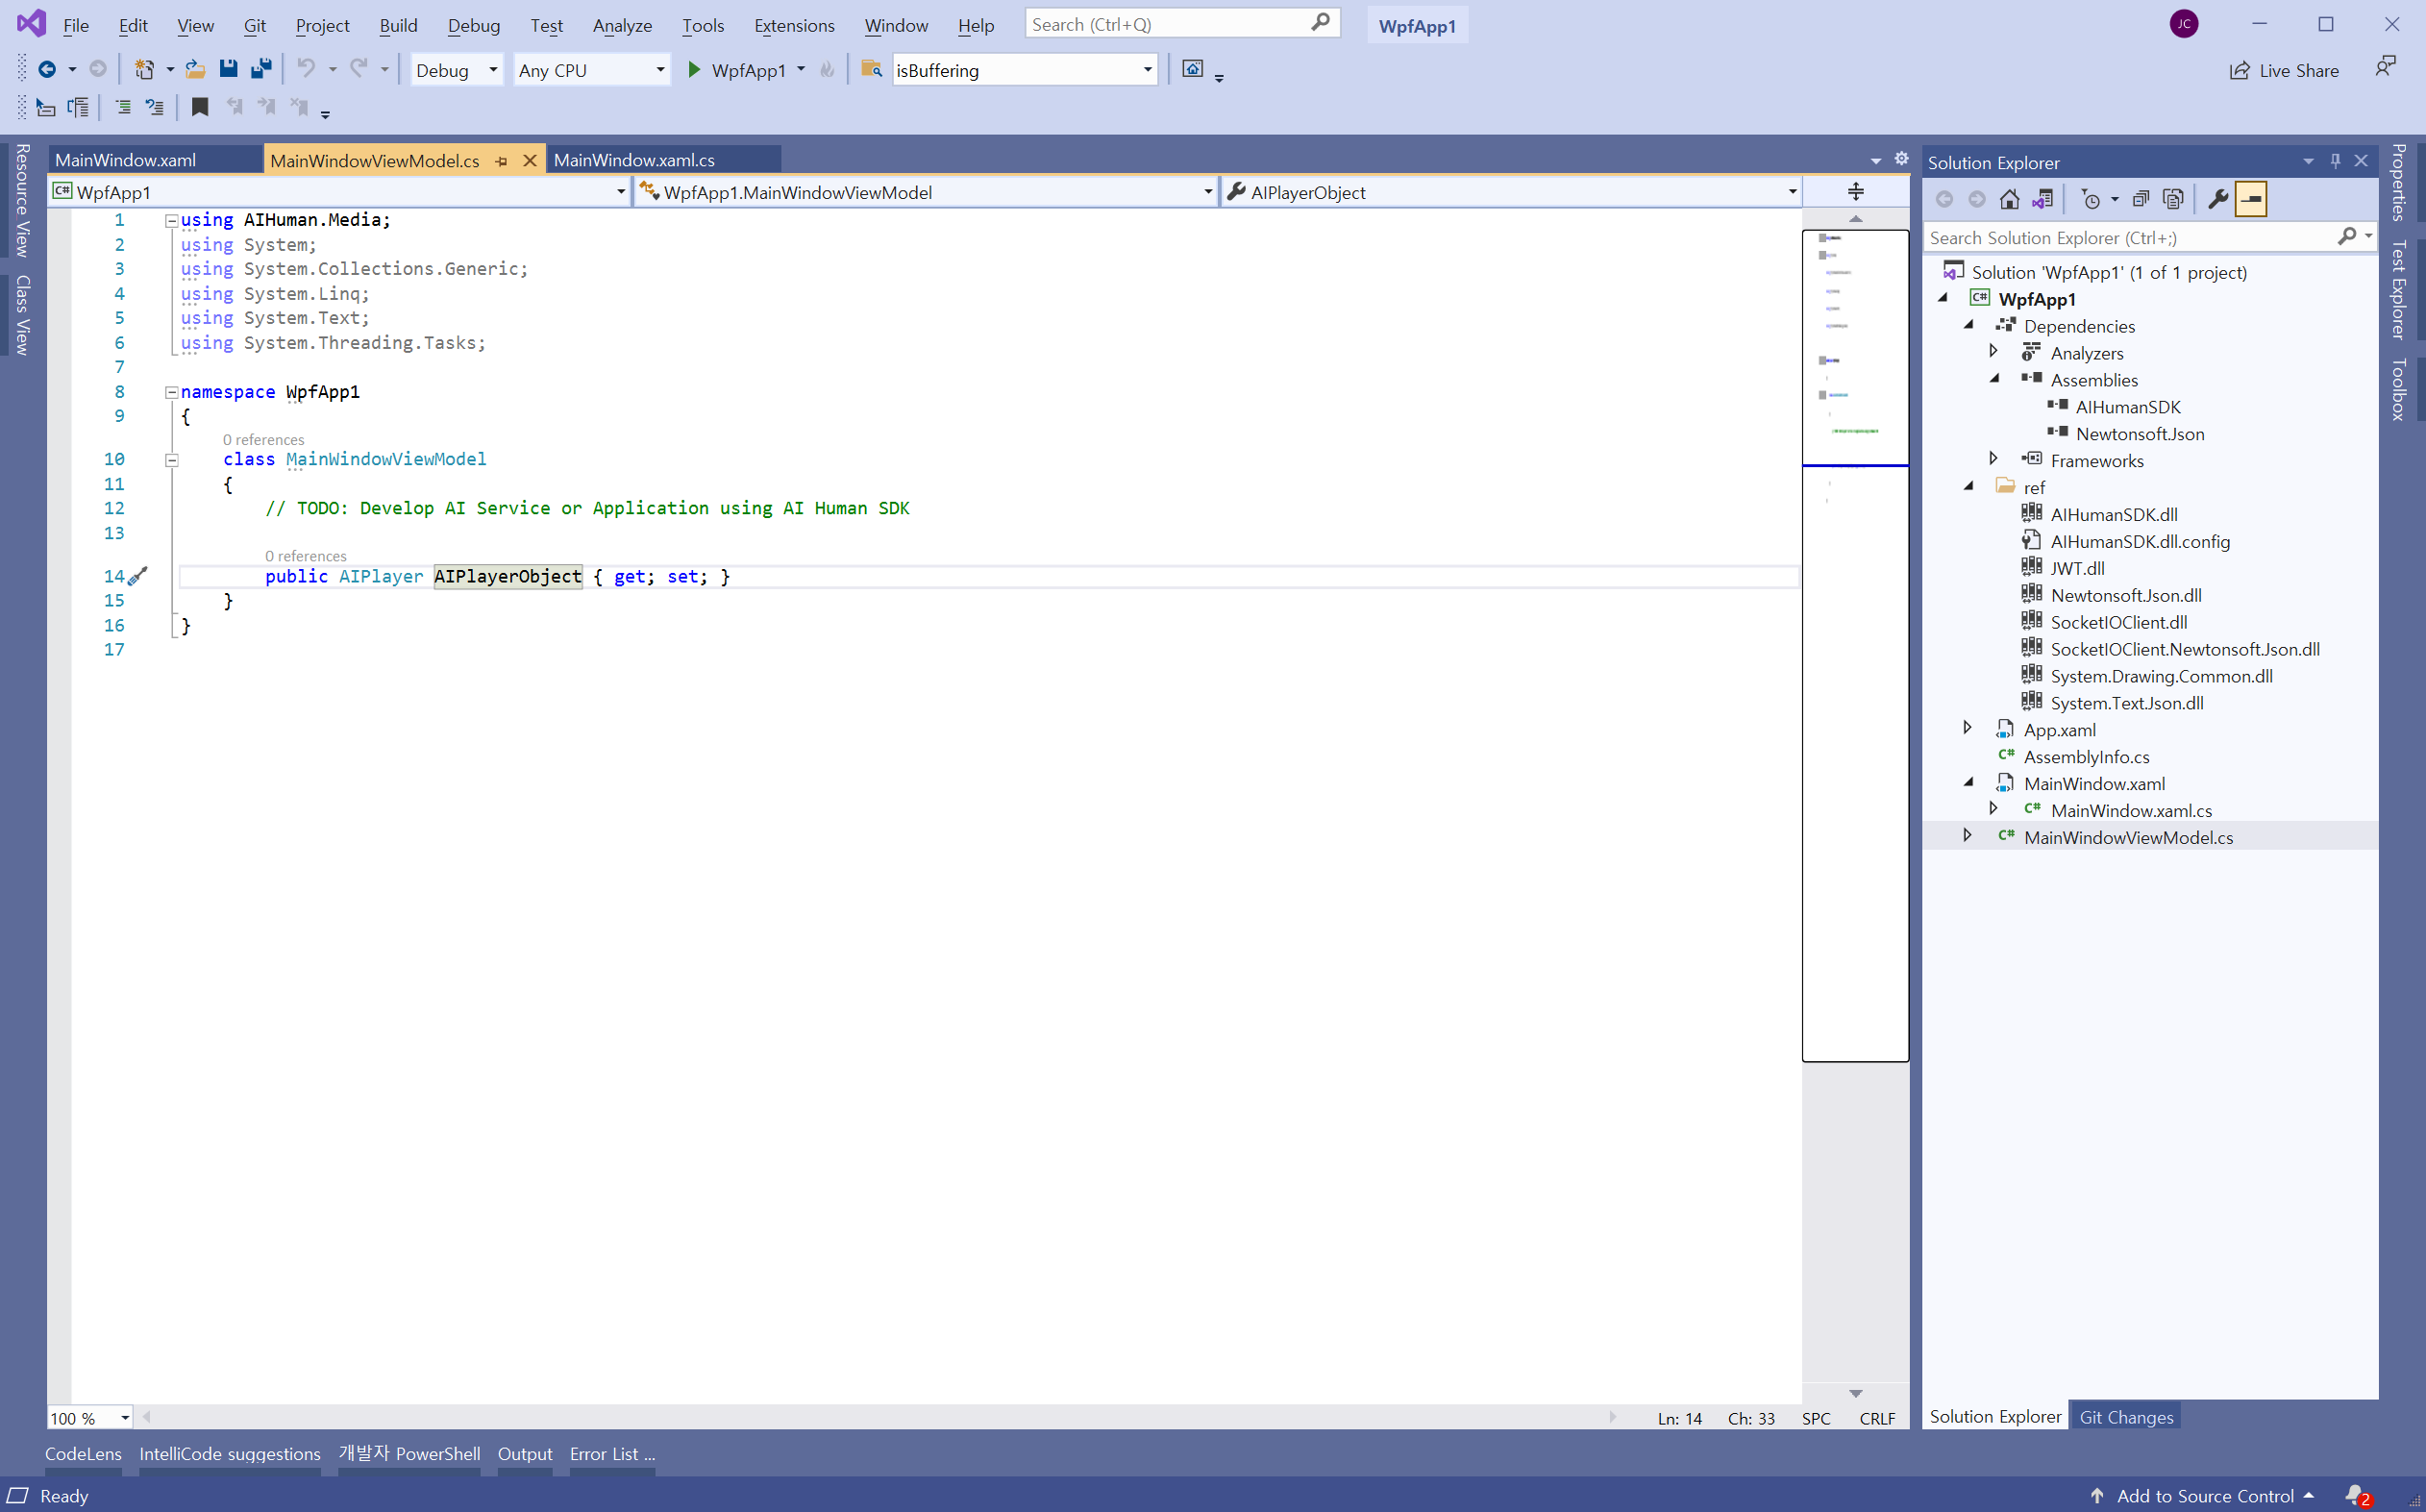
3. AIPlayer 객체 생성 및 콜백 구현하기
먼저 MainWindow.xaml과 같은 경로에 MainWindowViewModel.cs 파일을 만듭니다.
아래 코드를 참조하여 AIPlayer 객체를 생성하고 IAIPlayerCallback 인터페이스 상속을 통해 AI Human 이벤트 콜백 등의 함수들을 구현해 보세요.
- MainWindowViewModel.cs
using AIHuman.Common.Base;
using AIHuman.Common;
using AIHuman.Interface;
using AIHuman.Media;
using AIHuman.WPF;
using System;
using System.Collections.ObjectModel;
using System.Windows.Threading;
using System.Windows;

namespace WpfApp1
{
    public class MainWindowViewModel : ViewModelBase, IAIPlayerCallback
    {
        private AIPlayer _aiPlayer;
        public AIPlayerView AIPlayerObject
        {
            get => (AIPlayerView)_aiPlayer.GetObject();
            private set => OnPropertyChanged(nameof(AIPlayerObject));
        }

        private string _status;
        public string AIStatusText
        {
            get => _status;
            set
            {
                _status = value;
                OnPropertyChanged(nameof(AIStatusText));
            }
        }

        private string _inputText;
        public string InputText
        {
            get => _inputText;
            set
            {
                _inputText = value;
                OnPropertyChanged(nameof(InputText));
            }
        }

        private ObservableCollection<string> _speechList;
        public ObservableCollection<string> SpeechList
        {
            get => _speechList;
            private set
            {
                _speechList = value;
                OnPropertyChanged(nameof(SpeechList));
            }
        }

        public RelayCommand SpeakCommand { get; private set; }

        public MainWindowViewModel()
        {
            SpeechList = new ObservableCollection<string>();

            _aiPlayer = new AIPlayer(this);
            AIPlayerObject = (AIPlayerView)_aiPlayer.GetObject();

            SpeakCommand = new RelayCommand(Speak_Command);
        }

        public void OnAIPlayerError(AIError aiError)
        {
            Application.Current.Dispatcher.BeginInvoke(DispatcherPriority.Render, new Action(() =>
            {
                SpeechList.Add(aiError.ToString());
                AIStatusText = nameof(AIError);
            }));
        }

        public void OnAIPlayerResLoadingProgressed(int current, int total)
        {
            Application.Current.Dispatcher.BeginInvoke(DispatcherPriority.Render, new Action(() =>
            {
                float progress = ((float)current / (float)total) * 100;
                AIStatusText = $"AI Resource Loading... {progress}%");
            }));
        }

        public void OnAIPlayerEvent(AIEvent aiEvent)
        {
            switch (aiEvent.EventType)
            {
                case AIEvent.Type.RES_LOAD_COMPLETED:
                    Application.Current.Dispatcher.BeginInvoke(DispatcherPriority.Render, new Action(() =>
                    {
                        AIStatusText = "AI Resource loading completed.";
                    }));
                    break;
            }
        }

        private void Speak_Command(object args)
        {
            if (string.IsNullOrEmpty(InputText) == false)
            {
                _aiPlayer.Send(new[] { InputText });
                SpeechList.Add(InputText);
                InputText = string.Empty;
            }
        }
    }
}
- MainWindow.xaml
<Window x:Class="WpfApp1.MainWindow"
        xmlns="http://schemas.microsoft.com/winfx/2006/xaml/presentation"
        xmlns:x="http://schemas.microsoft.com/winfx/2006/xaml"
        xmlns:d="http://schemas.microsoft.com/expression/blend/2008"
        xmlns:mc="http://schemas.openxmlformats.org/markup-compatibility/2006"
        xmlns:local="clr-namespace:WpfApp1"
        d:DataContext="{d:DesignInstance Type=local:MainWindowViewModel}"
        mc:Ignorable="d"
        Title="MainWindow" Height="450" Width="800">
    <Grid>
        <Grid.ColumnDefinitions>
            <ColumnDefinition/>
            <ColumnDefinition/>
        </Grid.ColumnDefinitions>

        <ContentControl Margin="0" Grid.Column="0" Content="{Binding Path=AIPlayerObject}" Focusable="False" />

        <Grid Margin="0" Grid.Column="1">
            <Grid.RowDefinitions>
                <RowDefinition Height="1*"/>
                <RowDefinition Height="10*"/>
                <RowDefinition/>
            </Grid.RowDefinitions>

            <Grid Grid.Row="0">
                <Grid.Background>
                    <SolidColorBrush Color="#00D3D3"/>
                </Grid.Background>
                <Viewbox>
                    <TextBlock FontWeight="Bold">
                        <Label Content="{Binding AIStatusText}" />
                    </TextBlock>
                </Viewbox>
            </Grid>
            <Grid Grid.Row="1">
                <DockPanel>
                    <ScrollViewer VerticalScrollBarVisibility="Auto" HorizontalScrollBarVisibility="Auto">
                        <ItemsControl BorderThickness="0" ItemsSource="{Binding SpeechList}" Focusable="False" />
                    </ScrollViewer>
                </DockPanel>
            </Grid>
            <Grid Grid.Row="2">
                <Grid.ColumnDefinitions>
                    <ColumnDefinition Width="7*"/>
                    <ColumnDefinition/>
                </Grid.ColumnDefinitions>
                <TextBox Grid.Column="0" MaxLines="1" FontStretch="UltraExpanded" Text="{Binding InputText}">
                </TextBox>
                <Button Grid.Column="1" HorizontalAlignment="Stretch" Command="{Binding SpeakCommand}">
                    <TextBlock Padding="10, 5" Text="Send" />
                </Button>
            </Grid>
        </Grid>
    </Grid>
</Window>
- MainWindow.xaml.cs
using System.Windows;

namespace WpfApp1
{
    /// <summary>
    /// Interaction logic for MainWindow.xaml
    /// </summary>
    public partial class MainWindow : Window
    {
        public MainWindow()
        {
            InitializeComponent();

            DataContext = new MainWindowViewModel();
        }
    }
}
위의 설명에는 생략된 부분이 많습니다. Sample Project를 다운로드 받아서 솔루션 파일 실행 및 App.xaml와 QuickStartView.xaml, QuickStartViewModel.cs들을 참고하세요.
4. AI 발화 시키기
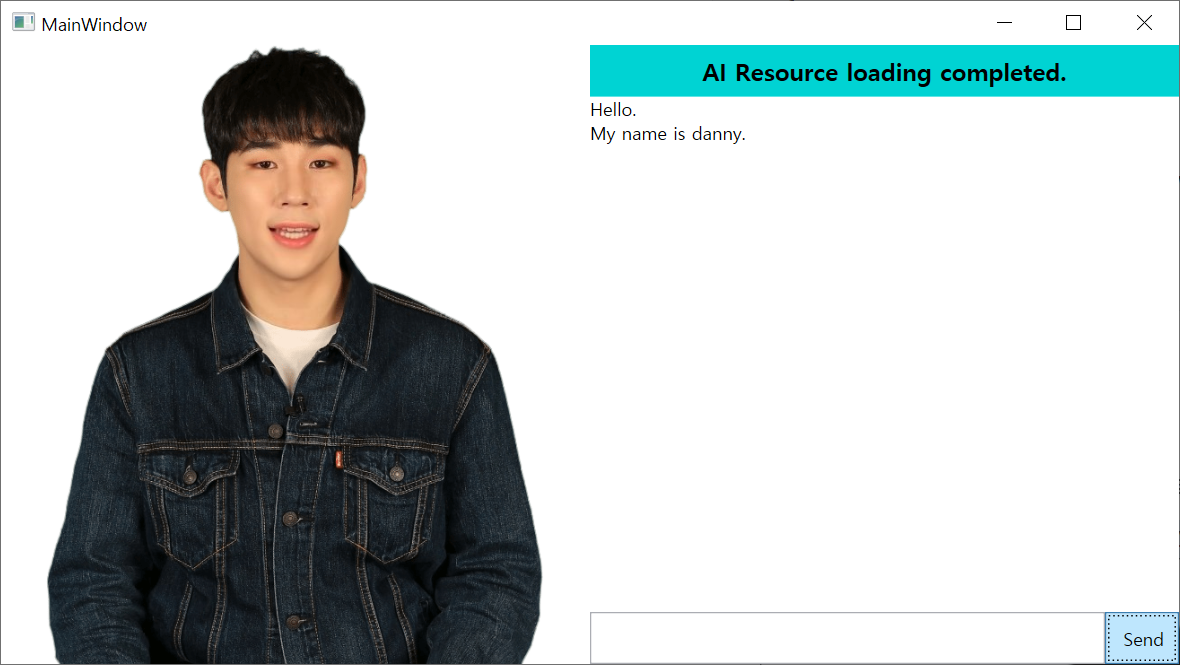
- 솔루션 빌드 > 디버깅 없이 실행 > (AI Human 모델 리소스 로딩) > 우측 하단 텍스트 박스에 발화 시킬 문장 입력 > Speak 버튼 클릭
실제 기본(default) AI Human 모델은 스크린샷과 다를 수 있습니다.