나의 AI Human 만들기
이어서 AIPlayer에서 기본 AI Human 모델을 셋업하고 AI에게 발화 시키는 과정을 알아봅니다. AIPlayer가 최초 초기화될 때 네트워크 상태에 따라 모델 리소스 로딩 시간이 지연될 수 있습니다.
팁
아래 파일들을 참고하세요.
- 1.QuickStart.scene
- DemoQuickStart.cs
- DemoPlayerCallback.cs
- DemoFrameImageProvider.cs
1. AIPlayer 기능 구현을 위한 Scene을 구성합니다.
1.1. Unity Editor 메뉴에서 Assets > Create > Scene을 선택하여 새로운 Scene을 생성
1.2.. 기본으로 생성되어 있는 Main Camera, Directional Light 게임오브젝트를 삭제
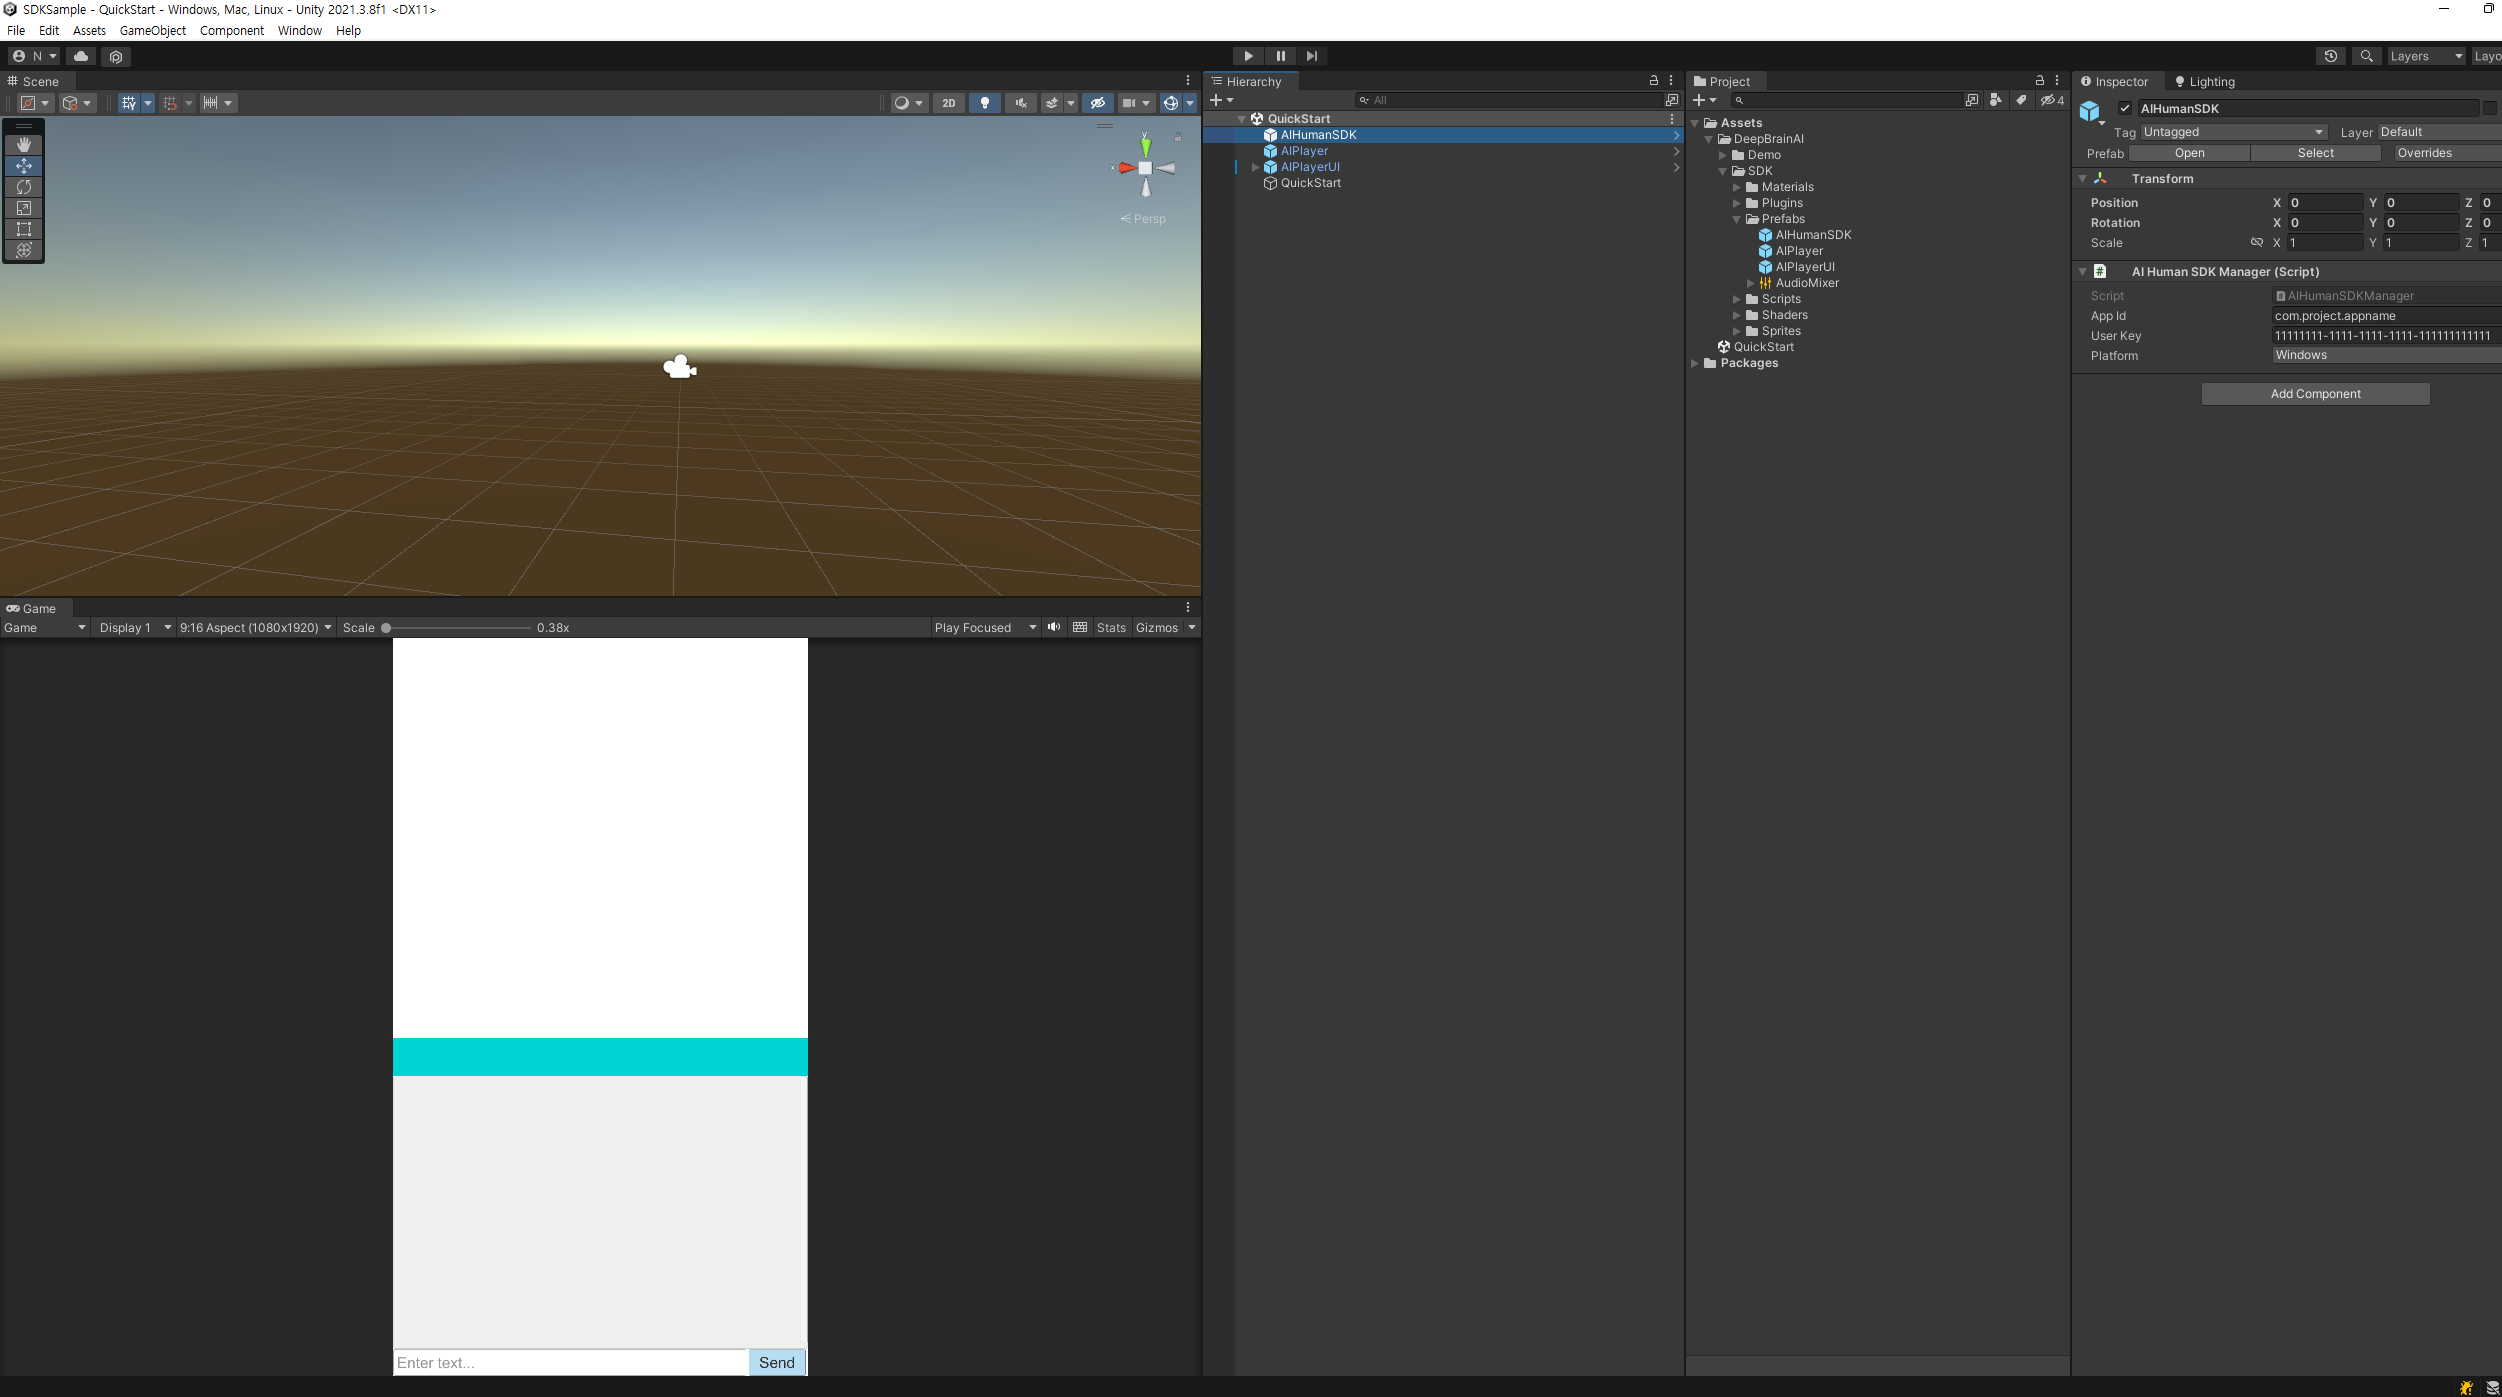
1.3. Project창의 Assets/DeepBrainAI/SDK/Prefabs 경로의 AIHumanSDK, AIPlayer, AIPlayerUI 프리팹을 선택 후 드래그앤드랍으로 Hierarchy창에 배치
1.4. Hierarchy창에서 AIHumanSDK 게임오브젝트를 선택 후 Inspector > AIHumanSDKManager 컴포넌트의 AppId, UserKey, Platform 항목에 AI Human 웹사이트 에서 발급 받은 인증 정보를 입력 또는 설정
1.5. Unity Editor 메뉴에서 GameObject > Create Empty 를 통해 새 게임오브젝트를 생성하고 이름은 QuickStart로 설정

2. AIPlayer 기능 구현을 위한 Script를 작성합니다.
Unity Editor 메뉴에서 Assets > Create > C# Script을 선택하여 스크립트를 생성 후 아래와 같이 작성합니다.
- MyAIPlayerCallback.cs
AIPlayer 동작 모니터링을 위해 AIPlayerCallback을 상속 및 구현합니다.
using UnityEngine;
using UnityEngine.UI;
using AIHuman.Common;
using AIHuman.SDK;

public class MyAIPlayerCallback : AIPlayerCallback
{
    public Text _statusText;

    public override void OnAIPlayerError(AIError error)
    {
        Debug.LogError(string.Format("{0} {1}", nameof(MyAIPlayerCallback), error.ToString()));

        _statusText.text = error.ToString();
    }

    public override void OnAIPlayerResLoadingProgressed(int current, int total)
    {
        float progress = ((float)current / (float)total) * 100f;
        _statusText.text = string.Format("AI Resource Loading... {0}%", (int)progress);
    }

    public override void OnAIPlayerEvent(AIEvent @event)
    {
        Debug.Log(string.Format("{0} {1}", nameof(MyAIPlayerCallback), @event.EventType));

        switch (@event.EventType)
        {
            case AIEvent.Type.RES_LOAD_STARTED:
                {
                    _statusText.text = "AI Resource loading started.";
                    break;
                }
            case AIEvent.Type.RES_LOAD_COMPLETED:
                {
                    _statusText.text = "AI Resource loading completed.";
                    break;
                }
            case AIEvent.Type.AICLIPSET_PLAY_PREPARE_STARTED:
                {
                    _statusText.text = "AI started preparation to speak.";
                    break;
                }
            case AIEvent.Type.AICLIPSET_PLAY_PREPARE_COMPLETED:
                {
                    _statusText.text = "AI finished preparation to speak.";
                    break;
                }
            case AIEvent.Type.AICLIPSET_PLAY_STARTED:
                {
                    _statusText.text = "AI started speaking.";
                    break;
                }
            case AIEvent.Type.AICLIPSET_PLAY_COMPLETED:
                {
                    _statusText.text = "AI finished speaking.";
                    break;
                }
            case AIEvent.Type.AICLIPSET_PLAY_FAILED:
                {
                    _statusText.text = "AI failed to speak.";
                    break;
                }
            case AIEvent.Type.AI_CONNECTED:
                {
                    _statusText.text = "AI is connected.";
                    break;
                }
            case AIEvent.Type.AI_DISCONNECTED:
                {
                    _statusText.text = "AI is disconnected.";
                    break;
                }
            case AIEvent.Type.AICLIPSET_PLAY_BUFFERING:
                {
                    _statusText.text = "Buffering in progress.";
                    break;
                }
            case AIEvent.Type.AICLIPSET_RESTART_FROM_BUFFERING:
                {
                    _statusText.text = "Buffering is complete and restart.";
                    break;
                }
            case AIEvent.Type.AIPLAYER_STATE_CHANGED:
                {
                    break;
                }
        }
    }
}
- MyAIFrameImageProvider.cs
AI 이미지(UnityEngine.Texture2D)를 공급받기 위해 AIFrameImageProvider를 상속 및 구현합니다.
using UnityEngine;
using UnityEngine.UI;
using AIHuman.SDK;
using AIHuman.Common;

public class MyAIFrameImageProvider : AIFrameImageProvider
{
    public RawImage _backgroundRawImage = null;
    public RawImage _faceRawImage = null;

    // Set background texture (png)
    public override void OnChangeBackgroundTexture(Vector3 scale, Texture2D bgTexture)
    {
        _backgroundRawImage.gameObject.SetActive(true);

        _backgroundRawImage.GetComponent<RectTransform>().sizeDelta = new Vector2(bgTexture.width, bgTexture.height);

        _backgroundRawImage.texture = bgTexture;
        _backgroundRawImage.transform.localScale = scale;
    }

    // Set background texture (webp)
    public override void OnChangeBackgroundTexture(int frameIdx, byte[] bytes)
    {
        StartCoroutine(LoadBackgroundTexture(frameIdx, bytes, (bgTexture) =>
        {
            _backgroundRawImage.gameObject.SetActive(true);

            _backgroundRawImage.GetComponent<RectTransform>().sizeDelta = new Vector2(bgTexture.width, bgTexture.height);

            _backgroundRawImage.texture = bgTexture;
        }));
    }

    public override void OnChangeFaceTexture(Vector3 scale, int idleWidth, int idleHeight, FaceRect faceRect, Texture2D faceTexture)
    {
        _faceRawImage.gameObject.SetActive(true);

        _faceRawImage.GetComponent<RectTransform>().sizeDelta = new Vector2(faceTexture.width, faceTexture.height);

        float faceX = ((faceRect.width - idleWidth) * 0.5f) + faceRect.x;
        float faceY = -faceRect.y;

        _faceRawImage.GetComponent<RectTransform>().anchoredPosition = new Vector2(faceX, faceY);

        _faceRawImage.texture = faceTexture;
        _faceRawImage.transform.localScale = scale;
    }

    public override void OnDisabledBackgroundTexture()
    {
        _backgroundRawImage.gameObject.SetActive(false);
    }

    public override void OnDisabledFaceTexture()
    {
        _faceRawImage.gameObject.SetActive(false);
    }

    public override void OnChromakeyFaceTexture(float minHue, float maxHue, float bottomAlphaHeight, float topAlphaHeight, float sideAlphaWidth)
    {
        _faceRawImage.material.SetFloat("_HueMin", minHue);
        _faceRawImage.material.SetFloat("_HueMax", maxHue);
        _faceRawImage.material.SetFloat("_FaceBtmAlphaHeight", bottomAlphaHeight);
        _faceRawImage.material.SetFloat("_FaceTopAlphaHeight", topAlphaHeight);
        _faceRawImage.material.SetFloat("_FaceSideAlphaWidth", sideAlphaWidth);
    }
}
- QuickStart.cs
SDK 인증 프로세스 및 AIPlayer 초기화 코드를 작성하고 버튼 클릭을 통한 AI 발화를 구현합니다.
using UnityEngine;
using UnityEngine.UI;
using System.Text;
using AIHuman.SDK;
using AIHuman.Common;
using AIHuman.View;
using AIHuman.Core;

public class QuickStart : MonoBehaviour
{
    public AIPlayer _aiPlayer;
    public AIPlayerCallback _aiPlayerCallback;
    public AIFrameImageProvider _aiFrameImageProvider;
    public InputField _inputChat;
    public Text _chatHistory;
    public Button _btnSend;

    private StringBuilder _sb = new StringBuilder();

    private void Start()
    {
        AIError aiError = AIHumanSDKManager.Instance.Authenticate();
        if (aiError == null)
        {
            _aiPlayer.Init(AIAPI.Instance.DefaultAIName, _aiPlayerCallback, _aiFrameImageProvider);
        }
        else
        {
            Debug.LogError(string.Format("{0} {1} {2}", nameof(AIHumanSDKManager), aiError.ErrorCode, aiError.Description));
        }

        _btnSend.onClick.AddListener(OnClickSend);
    }

    public void OnClickSend()
    {
        if (!string.IsNullOrEmpty(_inputChat.text))
        {
            string[] requests = new string[] { _inputChat.text };
            _aiPlayer.Send(requests);

            for (int i = 0; i < requests.Length; i++)
            {
                if (!string.IsNullOrEmpty(_sb.ToString()))
                {
                    _sb.Append("\n");
                }
                _sb.Append(requests[i]);
            }
            _chatHistory.text = _sb.ToString();
            _inputChat.text = string.Empty;
        }
    }
}
3. 작성한 스크립트를 적용합니다.
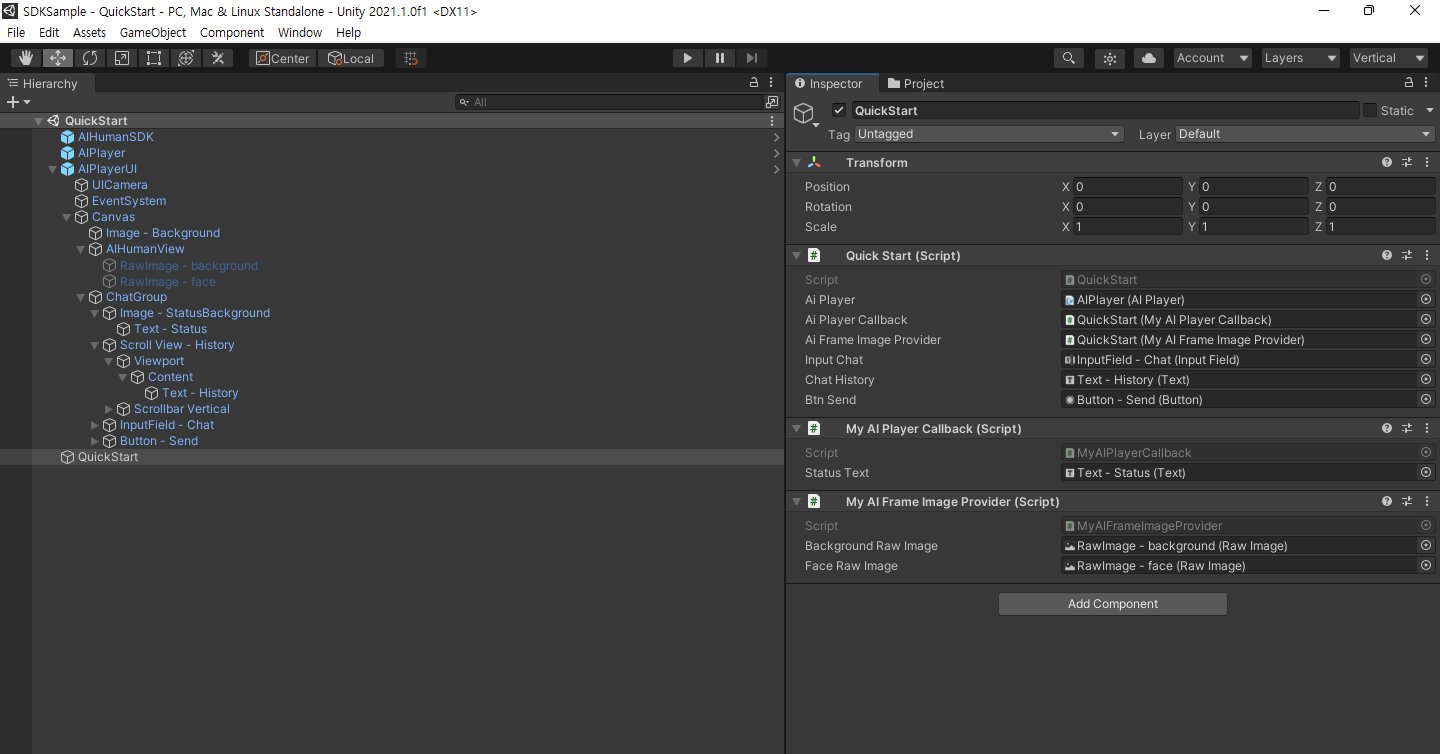
3.1. Hierarchy창에서 QuickStart 게임오브젝트를 선택 후 2번 항목에서 작성한 스크립트들을 Inspector창에서 Add Component 버튼을 통해 등록
3.2. Inspector창의 각 항목들을 아래 이미지와 같이 Hierarchy창에서 해당 게임오브젝트 선택 후 드래그앤드롭을 통해 등록

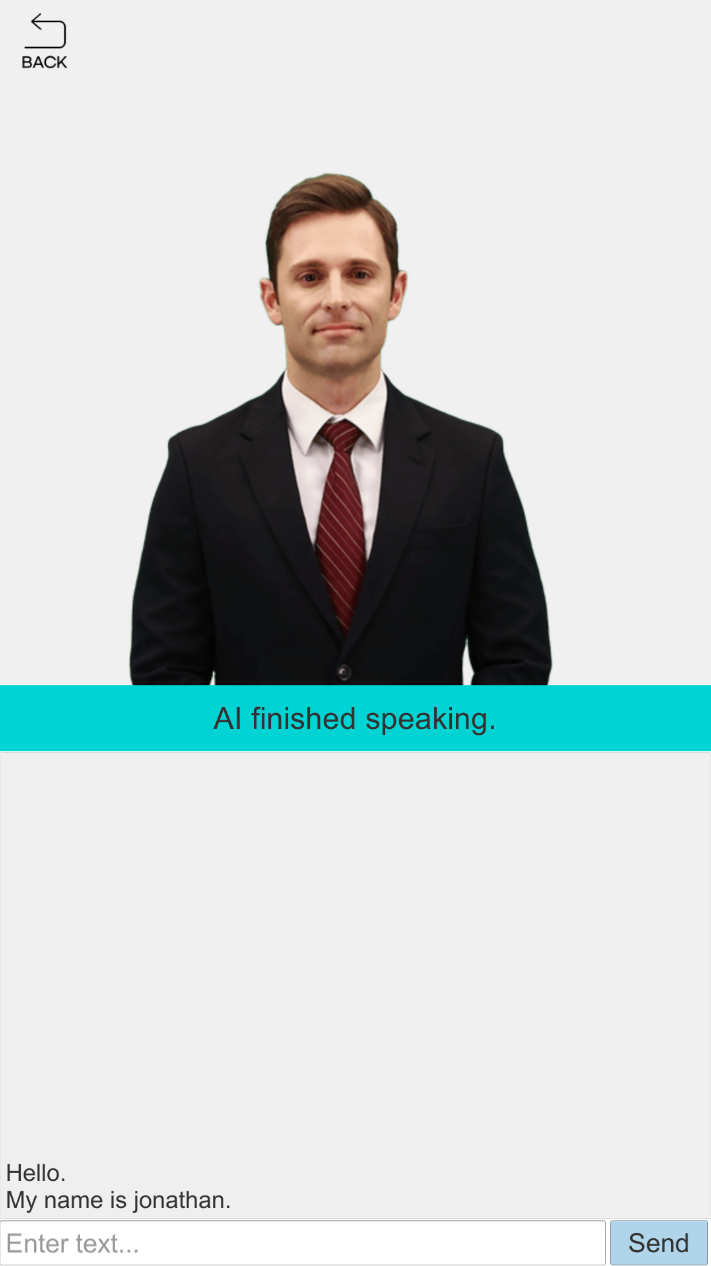
4. 한 문장 발화 테스트
- Editor Play > 리소스 로딩 > 하단 InputText에 문장 입력 > Send 버튼 클릭
노트
실제 AI Human은 스크린샷과 다를 수 있습니다.
